Assembling an ArmoredCloset is a straightforward process that ensures your space is secure and fortified. This guide will walk you through each step, providing detailed instructions to help you achieve a perfect assembly. Whether you're installing it in a room, closet, or another designated area, this guide is designed to make the process as smooth as possible.
Let's get started - To Assemble an ArmoredCloset is an efficient process with the right tools and detailed instructions. By following this comprehensive guide, you can ensure that your ArmoredCloset is securely assembled, providing you with a robust and reliable safe space.
Preparation
Before you begin, gather all the necessary tools and materials:
- Hammer drill
- Torque wrench
- 1/2" concrete drill bit
- Pallet with ArmoredCloset panels
- Hinge pins
- Small wood roller
- Acrylic ballistic window
- Deadbolts and door handle
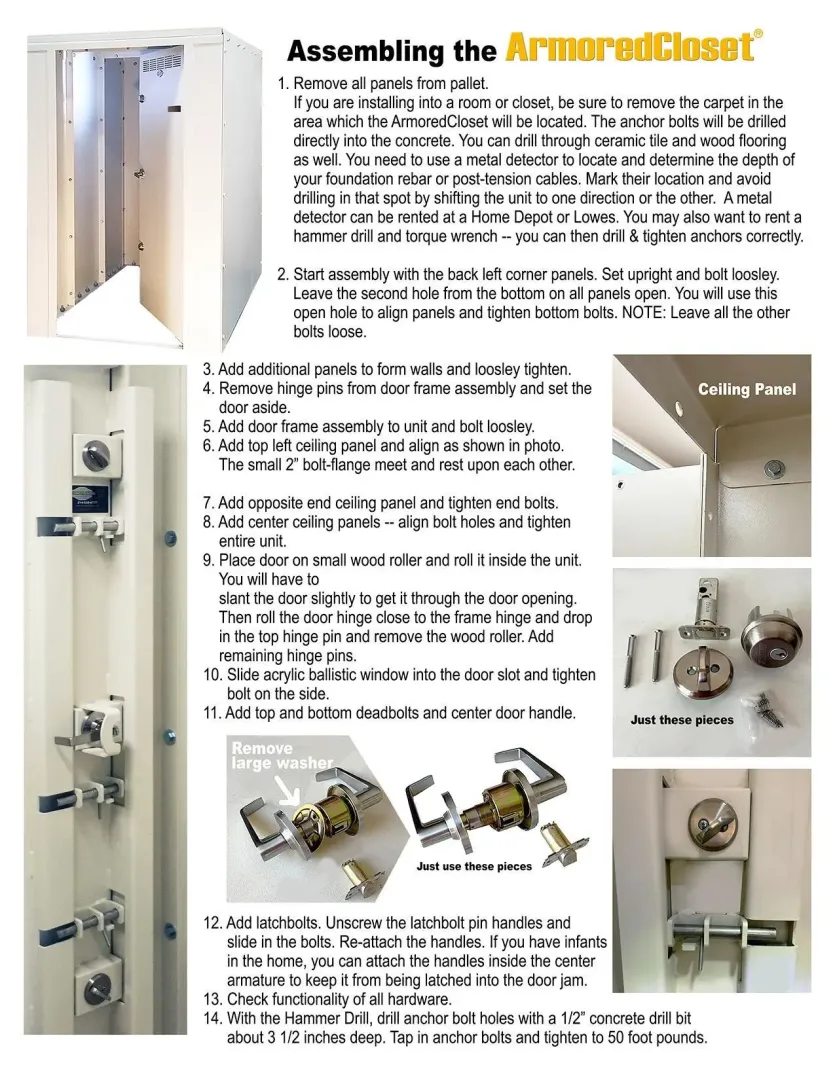
Remove Panels from Pallet
If you are installing into a room or closet, start by removing the carpet in the area where the ArmoredCloset will be located. The anchor bolts will be drilled directly into the concrete. You can drill through ceramic tile and wood flooring as well. If necessary, use a metal detector to locate and avoid foundation rebar or post-tension cables. This can be rented at Home Depot or Lowe’s.
Start Assembly
Begin with the back left corner panels. Set them upright and bolt them loosely. Leave the second hole from the bottom on all panels open. This open hole will help align panels and tighten bottom bolts. Remember, leave all other bolts loose at this stage.
Form Walls and Frame
Add additional panels to form the walls and loosely tighten the bolts. Next, remove the hinge pins from the door frame assembly and set the door aside.
Install Door Frame
Attach the door frame assembly to the unit and bolt it loosely. This provides the basic structure for your ArmoredCloset.
Install Ceiling Panels
Add the top left ceiling panel and align it as shown in the provided diagrams. Ensure the small 2" bolt-flange meet and rest upon each other. Repeat this process with the opposite end ceiling panel and tighten the end bolts. Align the center ceiling panels, ensuring all bolt holes are aligned, and then tighten the entire unit.
Add the Opposite End Ceiling Panel
Add the opposite end ceiling panel and tighten the end bolts.
Align and Tighten Center Ceiling Panels
Align the center ceiling panels, ensuring all bolt holes are aligned, and then tighten the entire unit.
Install the Door
Place the door on a small wood roller and roll it inside the unit. You may need to slant the door slightly to get it through the door opening. Once inside, align the door hinge close to the frame hinge and drop in the top hinge pin. Remove the wood roller and add the remaining hinge pins.
Install the Ballistic Window
Slide the acrylic ballistic window into the door slot and tighten the bolt on the side to secure it.
Add Deadbolts and Door Handle
Install the top and bottom deadbolts and the center door handle.
Install Latchbolts
Unscrew the latchbolt pin handles and slide in the bolts. Re-attach the handles. If you have infants in the home, you can attach the handles inside the center armature to prevent accidental latching.
Check Functionality
Ensure all hardware functions correctly.
Anchor the Unit
With a hammer drill, drill anchor bolt holes using a 1/2" concrete drill bit to a depth of about 3 1/2 inches. Tap in anchor bolts and tighten them to 50 foot-pounds.